How to create a Webmoney wallet and put money on it
The popular electronic money in Runet is WebMoney (abbreviated as WM, in Russian “webmoney”). Many online stores and commercial portals work with Webmoney.
Anyone who is thinking about receiving additional income on the network may need to create a Webmoney wallet for this. Also, webmoney can be used to pay for products and services, utility bills, mobile communications, television, etc.
Many users start WM-purses and if they have some experience (and experience, as they say, is a profitable business), they enjoy using this payment system.
How to create a Webmoney wallet
If you start a Webmoney wallet, then you can work with it either directly through the browser, or through applications installed on your computer or on your mobile phone. For those who use small amounts, it is probably easier to work through a browser.
Registration on the official Webmoney website must be completed once, and then you can use your webmoney wallet through the "Login" (4 in Fig. 1).
In fig. 1 in the top menu you can see that registration of webmoney takes 4 steps for free (steps are clickable):
It all starts with the first step:
1) Enter phone
To create a Webmoney wallet, follow the link to
And enter your mobile phone number, which should be at your fingertips when registering:
Rice. 1. The first step to create a Webmoney wallet: enter your phone number
Enter the phone number without errors in the field marked with the number 1 in Fig. 1 in the format: country code, without spaces, immediately operator code and phone number. For Russia, the country code is 7. Therefore, we enter the phone number for Russia, for example, in this form: 79100012345. Press the "Continue" button (3 in Fig. 1). Hurray, the first step has been taken!
Number 2 in Fig. 1 noted that you can use webmoney applications for social networks if you have social media accounts.
Is it possible to register a webmoney wallet for Ukraine? Of course it is possible.
When entering the site, you can immediately click on the choice of language (5 in Fig. 1). Then we will see what languages webmoney is friends with:

Rice. 2. Choosing a language on the webmoney website
There are Russian, English, Ukrainian, Spanish, Portuguese, Turkish and others. There is no German language, probably in Germany the Webmoney payment system is not used.
Registration of a webmoney wallet for Ukraine and for some other countries (see languages in Fig. 2) consists of the same four steps that are described here.
2) Entering personal data
To be able to solve possible questions or problems with web money, you should enter reliable data: letter for letter, as in a passport. After registration, the data can be changed, it is no longer possible to edit it, you may have to create another Webmoney wallet. Although it will be possible to change the mobile number and e-mail.
By clicking "Continue" (3 in Fig. 1), we go to the second step of registration:

Rice. 3. The second step for registering webmoney for free: entering personal data
1 in fig. 3 - enter the date of birth. To do this, click on the small triangles in field 1. A drop-down menu of numbers will appear, in which you need to find and click on your date.
2 in Fig. 3 - choose the country of residence if another country is offered. If you click on the small triangle in field 2, you will see a huge list of countries: there is plenty to choose from. You need to find your country and click on it to select it.
3 in Fig. 3 - in this field we enter our email without errors.
Note:
- To register in the payment system, it is better to use a new e-mail and in the future this mail on the Internet, if possible, should not be shown. This is useful for reducing inbox spam and, most importantly, for preventing account hacking. Login, password, security question from new mail should be recorded in a notepad.
- Do not confuse your e-mail password and your Webmoney wallet password, these are different passwords.
4 in fig. 3 - choose a security question.
In addition to the mother's maiden name, you can choose "Favorite number", "Pet name", "Favorite sports team", "First car brand". (By the way, in Spain, each child is given 2 surnames at birth: the first is from the father, the second is from the mother. They have two surnames in their passports. Therefore, for Spaniards, the option with the mother's maiden name is hardly suitable).
5 in Fig. 3 - enter the answer to the question that you selected in field 4.
It is better to write all these data into a notepad as the data necessary to access the webmoney wallet.
6 in Fig. 3 - the checkboxes can be left (they are on by default), or you can remove them.
7 in Fig. 3 - without a tick in front of "I give ... consent" further the path is ordered, so this tick is required!
Please note that at each step, you can return to the previous step by clicking on the "Return" button. Until registration is completed, you can easily edit your data to create a Webmoney wallet.
Click "Continue" (8 in Fig. 3). The window "Check again the correctness of your personal data" will appear.
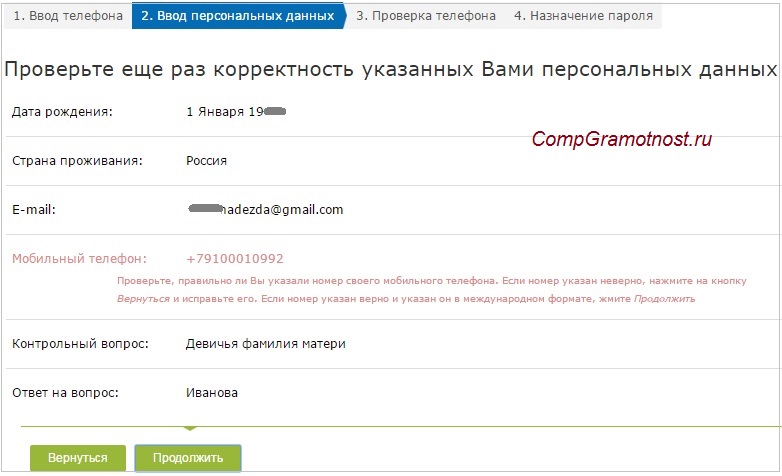
Rice. 4. We check our data for registering a webmoney wallet
We carefully check all the data again, it is better to write it down. At the bottom of this window there are buttons "Return" (if something is wrong) and "Continue".
If everything is correct, click on "Continue" again. Hurray, the second step has been taken!
3) Phone check
After clicking on the "Continue" button, an SMS message is sent to your mobile phone, containing a code to confirm that you are the owner of the phone.

Rice. 5. We confirm the mobile for Webmoney registration: enter the code from SMS
Enter the code received on the mobile phone in an SMS message (1 in Fig. 5), and click "Continue" (2 in Fig. 5).
4) Assigning a password
Here you need to come up with a password for your Webmoney wallet. This should be a new password that has nothing to do with the password from the e-mail that you specified when entering your personal data (Fig. 3).
You can use it. A password consisting only of numbers is bad, because numbers are most quickly selected using appropriate password guessing programs. The password for the wallet, in addition to letters, must at least include Latin letters. The presence of other characters (!,:, Etc.) increases the password strength.

1 in fig. 6 - come up with a strong password and write it down in a notebook,
2 - we repeat entering the same password, the main thing is to repeat it without errors,
3 in Fig. 6 - we enter the characters from the picture.
Click "OK".
Note: write down your data entered during registration in a notebook or otherwise. Relying only on your memory amid the flow of information in life and on the Internet is a utopia.
We get into the window (Fig. 7), in which you can immediately select the wallet currency.
A purse with a ruble currency is WMR, its number begins with the letter R, for example, a ruble webmoney number may look like this: R530000018008. Although it will be possible to create wallets with other currencies in your Webmoney account later, if you need them. Below are selected rubles (number 0 in Fig. 7).

Rice. 7. We accept the agreement and create our own webmoney wallet
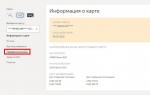
In the upper right corner, pay attention to the WMID - this is not yet the Webmoney purse number (1 in Fig. 7), but the WM identifier, which is just the address of a member of the Webmoney payment system.
Do not confuse WMID with a webmoney wallet number, they are different things. Topping up webmoney means putting money on the webmoney purse number, but NOT on the WMID.
So, as seen in fig. 8, the task - to create a Webmoney wallet - solved:

Rice. 8. Ruble WebMoney wallet has been created
Webmoney wallet number in fig. 8 is marked with numbers 1. It is this number that will be needed in order, for example, to replenish the webmoney wallet through the terminal, which will be discussed below.
Confirmation e-mail
In our mail, which was indicated during registration (Fig. 3), we are looking for a letter from the Webmoney Team with the heading "Confirm your email address":

Rice. 9. Confirmation of the email address for the webmoney wallet
To confirm your e-mail, click on the long link (red frame in Fig. 9). True, the entrance to the Webmoney wallet is carried out mainly by the mobile phone number, at least for an anonymous (unidentified) user.
Login after registration
Registration on the webmoney website takes place once. In the future, on your computer (smartphone), you can enter through the browser using the link:
Login to Mini WebMoney https://mini.webmoney.ru/
To enter your webmoney wallet, you need to enter your username and password. As a login, you should not use an e-mail, but a mobile phone number.
In the future, if necessary, you can go through the identification of the webmoney wallet in order to change the status of an anonymous user to an identified one. There are other levels of webmoney certification, if necessary, you can pass them.
Exit webmoney
The correct exit from the webmoney wallet is a small button in the upper right corner, which in fig. 8 is circled in red.
How to deposit money to Webmoney?
You can put money to your Webmoney wallet, or, if necessary, to someone else's wallet. To put money on someone else's Webmoney wallet (for example, through a terminal), you don't have to start your own wallet, although dealing with your wallet is, of course, easier and more enjoyable.
To make electronic payments directly from home, from the office or via mobile devices, you need to replenish your Webmoney wallet. There are different options to fund your Webmoney account, below is a helpful overview.
Webmoney replenishment methods
The official website of the payment system contains information about all available methods of replenishing a WM purse. This includes
- bank transfer,
- top-up from a mobile phone,
- remittance,
- terminals and
- special Webmoney cards.
You can use whichever option suits you at the moment.
You can replenish your Webmoney wallet in rubles. And if a different currency is needed for settlements, then you can make a quick exchange inside the Webmoney payment system. Currency exchange in Webmoney can be carried out directly through the system itself or through third-party services (through reliable exchangers). In order not to lose money on commissions when exchanging them, you can remember that it is reliable and practical to use webmoney on the network, for example, to pay for mobile, Internet, etc.
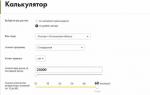
How to put money on webmoney through the terminal
If you want to replenish Webmoney in cash, then for this you need to write down (or print) the Webmoney wallet number on a piece of paper. As already mentioned, the number of the ruble WM purse may look like this: R530000012345. A number of approximately this type should be recorded without errors.
With the Webmoney wallet number written on a piece of paper, you should go to the nearest terminal, which is located in a store, shopping or office center, bank, or train station. All modern terminals are equipped with the function of replenishing electronic wallets. Through the terminal, you can top up both your Webmoney wallet and any other wallet.
- In order to deposit cash, you need to go to the "Electronic commerce" section at the terminal.
- After that, select the "Webmoney" icon and enter the number of your or another R-purse (ruble purse) in the field that appears without errors. Be sure to check the correctness of the entry.
- Then click "Next" and enter the required amount through the bill acceptor in the terminal.
Please note that replenishment of Webmoney through the terminal involves the payment of a commission. The amount of additional costs can range from 3 to 10%, depending on which electronic terminal you use. If you need to transfer a certain amount to someone, consider this point, otherwise you will have to go to the terminal again to report the money.
Money is credited to the Webmoney account almost immediately. Do not forget to take your check from the terminal to avoid possible problems with not crediting funds. Alas, no one is immune from technical failures. You can, for example, put money through a terminal on a webmoney wallet, come home or to an office and check the receipt of money in your wallet on your computer (smartphone).
Alternative ways to replenish your Webmoney wallet
You can receive funds to a WM purse not only by depositing cash or electronic money. You can earn a certain amount on the internet. Article exchanges, comment exchanges and other projects for making money on the Web work with Webmoney (and some - only with Webmoney), so you can receive money received for completing tasks to your webmoney wallet.
For beginners, such methods of earning as writing reviews, writing articles for content exchanges, taking paid surveys, posting messages, comments on forums and social networks, etc. are suitable. Of course, it will take time to earn even a small amount. Perhaps, for the first earnings, it is not the amount that is important, but the very fact of its receipt. Therefore, this option for replenishing a webmoney wallet takes place.
Now you know how to create webmoney and put money there.
How to create webmoney wallets of another currency
You can create Webmoney wallets in the following currencies:
- the ruble currency is WMR, such an account starts with the letter R (1 in Fig. 8),
- the dollar currency is WMZ, the account number starts with the letter Z (4 in Fig. 10),
- the euro currency is WME, its number is preceded by the letter E,
- WMU - equivalent to UAH,
- WMB - BMY equivalent,
- WMX - equivalent to 0.001 BTC,
- WMG - equivalent to 1 gram of gold,
- WMK is the equivalent of KZT.
The ruble webmoney wallet has already been created, now we create a webmoney wallet for the same WMID (1 in Fig. 10), for example, in dollars. This can be done in 6 clicks:

Rice. 10. How to create a webmoney wallet with a different currency: steps are numbered
1 in fig. 10 - you need to log into your Webmoney account,
2 in Fig. 10 - click on the + icon,
3 - click "Create wallet",
4 - select the required currency,
5 - read and be sure to tick the box next to "I accept the terms ...",
6 in Fig. 10 - click "Create". A wallet will appear with a number that will start with the letter Z (since the dollar currency was selected in Fig. 10).
How to remove Webmoney
Removing webmoney is not as easy as it might seem. The official webmoney website says that before deleting a Webmoney wallet, you must:
- Withdraw all funds.
- Repay loans, if any.
- Complete claims and claims, if any.

Rice. 11 How to remove Webmoney wallet
1 in fig. 11 - you need to go to your wallet,
2 - click on Settings,
3 in Fig. 11 - in the window that opens, click "Send a request for denial of service."
The request is checked by the webmoney technical support. A message is sent to the E-mail that in 7 days the service will be completely terminated, all data will be deleted irretrievably.
Webmoney technical support
Voting “What electronic money do you use or do NOT use at all?”
Get the latest computer literacy articles straight to your inbox.
Already more 3.000 subscribers