Insulation of the foundation on screw piles. Foundation on screw piles Vents in foundation from screw piles
No modern artificial imitations, no matter how well they are made, are able to convey the charm of a log house made of natural wood. IN Lately more and more owners country houses strives to build a house with his own hands from wood - logs or timber. And it’s not even about the natural beauty of the material - the high environmental friendliness of wood, combined with its ability to “breathe”, retain heat in winter and natural coolness in summer, allow wooden houses to maintain their popularity for many centuries.
The construction of wooden houses can be done at any time of the year.
However, experienced builders recommend that all construction work be carried out in winter, since in this case wood harvested in winter is used as building material. The advantage of winter wood harvesting is that winter wood contains the least amount of sap, and, therefore, has low percentage natural humidity. Such material is less susceptible to shrinkage, since the moisture contained in it freezes out quickly enough and with the arrival of heat, the wood dries just as quickly without deforming.
In addition, it is easier and cheaper to find contractors for building a house in winter - outside the construction season, most construction crews are freed up, and prices for their services are significantly reduced.
As well as any construction, construction wooden house produced on the foundation. Winter construction is possible, but only if there is a ready-made foundation for the future home.
WITH traditional types foundations in this case there is some complexity - before starting construction work the foundation must shrink or “overwinter.” That is, at least 1.5 years must pass from laying the foundation to the start of construction work, since laying is carried out in the summer. Not all customers are enthusiastic about this figure. And this problem can be completely resolved if a foundation on screw piles is used as the basis for future construction.
Pile-screw foundations- the technology is relatively new. Relative because it appeared almost two centuries ago, but it came to civil engineering quite recently, having previously been used for military needs. A screw pile is a hollow steel pipe equipped on one side with a pointed tip and drill blades arranged in such a way that when the pile is screwed in, the soil underneath is compacted and not loosened. This allows the screw piles to be firmly held in the ground without deviating from the design position throughout their entire service life.

Since a wooden house is quite light compared to, for example, a brick house, a foundation on screw piles is an ideal solution for the foundation of a house. To construct such a foundation, as a rule, piles with a diameter of 108 mm and a blade diameter of 300 mm are used. If it is necessary to strengthen the structure, it is possible to use piles of larger sizes.
Before installation of the foundation begins, a mandatory soil survey is carried out at the construction site. This is necessary in order to determine the depth of screwing in the pile (it should be below the freezing level). Wooden house on a pile-screw foundation can be built on almost any soil, except rocky. Based on data about the soil and the features of the future house, the load on each pile and, accordingly, the distance between the piles are calculated. Typically it is 3m, but can be reduced if necessary.
Installation screw piles When building a foundation for a wooden house, it is usually done manually - the size of the piles allows this quite well. After installing all the piles according to the design, they are leveled at the top at a distance of about 50cm above the ground surface. The pile cavity is concreted and each pile is equipped with a head on which the frame will be mounted. During construction wooden houses timber or the first crown of the house is used as a frame.
Video installations of pile- screw foundation
The installation process of a pile-screw foundation takes only a few days. In wooden house construction, screw piles are very popular because they can be installed in winter - the most favorable period for building a house. Construction on a foundation made of screw piles can begin immediately after its installation is completed.
Thus, the structure of the entire house along with the foundation can be erected in 1-1.5 months and the happy owner will only have to wait for the natural shrinkage of the wall material to begin finishing work.
The foundation on screw piles is also attractive for owners of wooden houses because the space between the ground and the first crown is well ventilated, regardless of the finishing material of the base. Even if the level groundwater in the building site is quite high, natural ventilation of the subfloor significantly extends the service life of the wood, providing the house structure with strength and durability. The guaranteed service life of screw piles is more than 100 years, provided that they are produced by responsible manufacturers. Thus, the combination of a pile-screw foundation and wooden walls allows the owner to get a reliable, warm, highly environmentally friendly home that will serve for many generations.
Ventilation in a private wooden house is as necessary as in any other building. It has its own nuances associated with the characteristics of wood as a natural material. The design and installation of a high-quality air exchange device must be carried out at the initial stage of construction. Let's take a closer look at why ventilation in a wooden house is necessary.
Ventilation in a private wooden house
The need to equip a wooden structure with an air circulation system is determined by the following factors:
- Hygroscopicity of wood. It is able to quickly absorb moisture from environment. Maintaining an optimal moisture level with the help of a high-quality ventilation installation will ensure a long life for wooden structures and save them from the appearance of fungus, mold, and microorganisms. Material that is overdried or saturated with moisture is very susceptible to deformation and destruction.
- The ability of wood to “breathe” is higher compared to brick, concrete, and other building materials. But air does not pass through the wood. Otherwise, in winter the heat would escape outside. The change of air masses inside such a structure will not happen on its own without proper organization of established air exchange by a person.
- Maintaining optimal temperature conditions. Heating a log home in winter can become energy-intensive. High-quality ventilation equipment not only changes air masses, but also allows you to save on heating due to heat, for example, from the earth or exhaust air flow.
- Human waste products. Wood is not able to utilize everything that a person produces in the process of life (carbon dioxide, thermal radiation, moisture release, etc.).
Types of air exchange inside a wooden cottage
A private wooden cottage provides the opportunity to organize following systems ventilation:
- Natural. It is organized using a natural air mass, which independently enters the room through open windows and doors and displaces the exhaust lighter air flow through the ventilation ducts.
- Forced:
- exhaust ( special equipment removes the waste mass outside);
— supply (devices pump a fresh flow from outside into the building);
— supply and exhaust (a unit with air ducts connected to it for removing/supplying exhaust/fresh air flow). - Mixed ventilation system.
Natural ventilation in a wooden house
The design of natural ventilation in a wooden house is carried out at the planning stage of its construction. It is organized using vertical air ducts that remove exhaust air from the premises upwards outside the structure. As a rule, such channels ensure its outflow from boiler rooms, bathrooms, dressing rooms and other rooms lacking constant ventilation.
Circulation inside the ventilation ducts is maintained due to the pressure difference created at the inlet and outlet. The higher the outlet of the ventilation duct is located, the greater the pressure - the air mass is removed faster.
 Scheme of natural ventilation at home
 The internal surface of the air ducts should be as smooth as possible, with the same cross-section, to prevent the accumulation of dust and ensure unhindered passage of air flow. The channels must be wide enough to circulate the required volume.
The circulation of natural ventilation is carried out due to the influx of air from the outside through the leaks of window/door openings, through open vents/windows/doors, and then displacing the exhaust through the air ducts. If the tightness of structures does not contribute to the natural change of air flows, it is necessary to consider a forced ventilation system.
Pros and cons of natural ventilation
Advantages:
- low cost;
- possibility of self-installation.
Flaws:
- low efficiency;
- the need for additional exhaust air removal from the kitchen and bathrooms;
- heat loss during the cold season;
- sound insulation is reduced;
- along with the air flow, dust and insects get inside;
- dependence on atmospheric conditions;
- inability to adjust performance.
Exhaust ventilation method
Forced ventilation in a wooden house using exhaust mechanisms is a system of air ducts through which the exhaust air flow is removed through the ventilation shaft to the outside. Old air is forced out of the room, fresh air comes in naturally. In this case, a fresh inflow must be provided in the same volume as the diverted one. To improve air exchange, fans are installed that increase the speed of removal of contaminated air masses.
 House exhaust ventilation system diagram
 Operating conditions:
- the warm waste stream is located above the fresh cold one;
- inflow sources are located below the outlet channels.
Advantages of exhaust ventilation:
- changing exhaust air masses to fresh ones is more effective than with natural circulation of flows;
- environmental friendliness of the materials used;
- the ability to control the force and speed of exhaust air removal.
Flaws:
- low efficiency;
- large heat losses.
Supply ventilation of a wooden house
Forced ventilation in a wooden house of a supply nature consists of various window valves and wall ventilators that pump air from the outside. The waste material exits independently through the ventilation ducts under supply pressure.
Advantages:
- constant flow of fresh air;
- cleaning the air supply from dust, debris, etc. to varying degrees.
Flaws:
- the cold stream from the street in winter has to be additionally heated, which leads to energy consumption;
- the exhaust air does not have time to give up its heat and is removed from the house;
- insufficient tightness of the connection between the ventilators and the wall.

Supply and exhaust air exchange
The necessary air exchange inside a wooden building will help organize a forced supply and exhaust ventilation device. It consists of air ducts equipped with fans, air purification filters, a heat recuperator, and an automatic control unit.

The ventilation diagram in a wooden house looks like this. The atmospheric flow from the street passes through the filtering system. With the help of fans it moves through the air duct, then it is supplied inside the rooms. Exhaust air is discharged outside through other air ducts. If the air handling unit is equipped with a heat recuperator, the incoming air is heated by the heat of the output (it is possible to recover up to 80% of the heat). In this case, the flows most often do not mix (depending on the recuperator model). The supplied air masses remain clean.
The influx inside a timber structure can be carried out through a ground heat exchanger. One end of the air duct is located above the ground, the other is connected to the ventilation device unit. The pipe is laid to a depth of 1.5-2 m. In winter, the heat of the soil will warm the incoming air. In summer, the supply air will be able to cool. In order for the air flow to warm up/cool down, the length of the underground air duct must be at least 15 m.
 Scheme of supply and exhaust ventilation in the house
 Advantages and disadvantages
Advantages of supply and exhaust air exchange:
- constant fresh air (with the windows closed);
- significant savings in thermal energy during the cold season (up to 25%);
- control of air exchange parameters;
- maintaining the optimal temperature for a wooden structure;
- maintaining an optimal microclimate;
- high-quality filtration of the supplied air flow;
- proper air exchange prolongs the life of a log cottage;
- absence of mold, mildew;
- excretion large quantity dust, moisture, excess heat (up to 98%);
- The installation of the air duct is hidden and is carried out in the inter-ceiling space.
Disadvantages of the device:
- high cost compared to natural ventilation devices;
- installation and installation are carried out by specialists;
- under the condition of a temporary lack of electricity, the supply and exhaust circulation stops working;
- periodic system maintenance;
- purchase of noise-insulating materials to reduce the operating noise level of equipment;
- separate room for equipment installation (attic, basement).
Separately about ventilation of the roof and floor of a wooden cottage
Roof
We should not forget about ventilation of the attic and roof space. It is very important to properly organize high-quality air exchange here using ventilation holes.
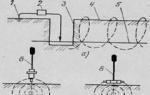
 Scheme of roof ventilation in a wooden house
 The air flow, heated by the heat of the entire structure, rises upward. When in contact with cold roofing structures and materials, it inevitably forms condensation. Without sufficient air exchange, the roof space will gradually rot and collapse under the influence of collecting moisture.
That is why the rafters are impregnated with waterproofing materials at the construction stage. Nevertheless, providing high-quality roof ventilation is necessary to maintain its integrity for a long time. The scheme of natural ventilation in the roof is quite simple. To do this, it is quite enough to equip the roof with dormer windows and ridge vents. In this case, ventilation openings will only be effective if they are located at the very ridge of the roof.
Effective floor ventilation is also important aspect general air exchange of a wooden structure. Do not allow air to stagnate under the floor, which can lead to the formation of condensation, mold, and, as a result, rotting of wood structures.
To prevent the destructive effects of moisture, small ventilation openings are left inside the foundation. Air intake openings are installed under the baseboards. The air flow passing through the vents and air intakes will ventilate the space under the floor, keeping them dry.
With the onset of cold weather, the vents in the foundation close, otherwise the cold flow from the street, coming into contact with the heat of the building, will settle as condensation. In summer they are always open. It should be remembered that all ventilation openings must be equipped with decorative rodent grilles.
A wooden cottage, like any other building, needs correct, high-quality, efficient system ventilation. This will ensure its long service life and make living inside it comfortable. The arrangement of the air exchange system is carried out at the construction stage. A professionally planned and well-organized ventilation scheme in a wooden house will avoid many unpleasant problems.
Insulation of floors along joists in a wooden house.
The construction of a pile foundation using screw elements allows the construction of houses in swamps, coastal zones and hilly areas. When choosing SIP technology, the floors of the lower level are reliably thermally insulated by default.
In “frameworks”, log houses, panel and half-timbered buildings, the floor-on-joists technology is used. Therefore, in wooden frame house it is necessary to additionally insulate the floor for comfortable stay and reducing the operating budget for heating.
Domestic SNiPs exist solely for calculation pile foundations. Regulatory documents there is no provision for insulating the basement of a building. Ventilation and insulation of these architectural elements are carried out in accordance with the requirements of SNiP dated 2003, number 31.01 for residential buildings (now replaced by SP 54.13330.2011).
The manufacturer of extruded polystyrene foam Penoplex has technical solutions for heated floors using joists. Taking into account the requirements given in these documents, the individual developer must ensure:
- laying insulation between the joists - sheets of expanded polystyrene or basalt wool rest on the subfloor, are waterproofed from below and covered with a vapor barrier from above;
- fence for piles - imitation of a plinth made of facing material on a frame;
- ventilation ducts - the area of each hole is from 0.05 m2 (most often a pipe is 100 mm), total area 1/400 from the perimeter of the basement walls;
- blind area around the perimeter - for drainage of storm and melt runoff.
Attention: Treating wooden structures resting on piles with a conventional antiseptic is not enough. These compounds erode after 6–7 years of use; re-coating in an underground 0.5–0.7 m high is physically impossible without opening the floors. Therefore, it is necessary to use deep penetrating mixtures.
The best option in this case is the Maxiwood composition or similar compositions:
- colorless transparent liquid without harmful secretions;
- has the density of water, allowing you to treat logs with a spray gun;
- increases moisture resistance by 20%, penetrates the wood structure by 1 cm, creating crystalline structures inside it.
It is better to treat joists, beams, and subfloor boards with waterproofing materials at the initial stage of construction of a home. This will eliminate the need to open the base at the finishing stage to install the heat insulator. The technology for heated floors on beams is as follows:
- sheathing arrangement - bars are attached to the bottom of the beams, joists from the inside along the load-bearing elements of the floor;
- installation of the sub-base - OSB, chipboard, multi-layer plywood or edged boards are laid between the beams on previously nailed bars (the lower part is impregnated with a penetrating mixture);
- waterproofing - waterproofing is laid on top of the base;
- thermal insulation - basalt wool or extruded polystyrene foam (PSB-S or XPS) is laid on top of the waterproofing in three to four layers in a checkerboard pattern;
- vapor barrier – the top of the insulation is protected by a vapor barrier.
Further insulation scheme for a house on screw piles may differ depending on the type flooring included in the design of the premises:
- multilayer plywood - for laying laminate, parquet, floorboards, piece or modular parquet, cork, carpet and linoleum;
- dry screed - for decorating with porcelain stoneware, linoleum, tiles, cork, PVC tiles and laminate;
- self-leveling screed - most often for underfloor heating systems.
Floor insulation scheme
For a building on screw piles, the following floor thermal insulation scheme along the joists is used:

Scheme of floor insulation along joists in a wooden house.
- cranial block - fixed with self-tapping screws, nails flush with the lower edge of the beam;
- subfloor - filling the space between the joists with edged boards, plywood, OSB, chipboard;
- waterproofing – roll of glassine, roofing felt, PVC film, special waterproofing membranes;
- insulation – XPS or PSB-S expanded polystyrene blocks, basalt wool;
- vapor barrier - a membrane or film that cuts off excessively humid air from the room into the heat-insulating layer;
- sound insulation - ready-made solutions from manufacturers ZIPS, Knauf or an additional layer of mineral wool on counter-battens with lining with sheets of gypsum fiber board, plywood.
This technology is relevant in frame, log, and panel houses. It provides insulation of the lower floor and allows the use of any floor coverings.
However, insulating the floor for a building on screw piles is not enough for normal operation. An excessively ventilated underground will lead to additional heat loss through the lower floor along the joists. The efficiency of underfloor heating will decrease and energy consumption in heating systems will increase. Climbing along piles using one of the methods below will eliminate these troubles.
Picking up a screw foundation
When a building is supported on piles, in this case screw ones, there is no structural element - a plinth. In some cases, the underground level is decorated with a fence - an imitation of a plinth that does not bear the load from the building's load-bearing frame. Design in mandatory complemented by a blind area along the cut-off waterproofing.
Main mistakes when designing a fence
Most individual developers believe that if the false base is insulated, the temperature in the underground will increase. This is fundamentally wrong - the heat insulator only retains heat, and does not produce it independently. In the absence of a heating source between the floor/ground, a layer of insulation is a waste of money.
Important: With any method of decorating the underground, it is necessary to leave ventilation ducts. In the absence of a building's ring drainage, the soil under the base of the cottage releases a lot of moisture. Which must be diverted by a natural ventilation system. The joists and subfloor must be treated with an antiseptic and waterproofing impregnation.
Depending on the tasks being solved, the base on screw piles can be decorated and protected from blowing. There are several technical solutions:
- the fence is completely absent - the cottage is on a hill, the height difference under the base of the house exceeds 1.5 m, large-format triangles in the basement will spoil appearance;
- insulated frame system - the underground is planned to be used for storage, so heaters are installed in it;
- cladding without insulation - the height of the underground is insignificant, the false base will be an excellent addition to the facade exteriors, a heat insulator is not needed here.
In the lower part of the cladding, the fence is in contact with the ground, inside of which heaving forces may be present in winter. Therefore, it is better to replace the fertile layer (0.4 - 0.6 m) with sand, in which these forces cannot occur. To do this, it is enough to dig a trench the width of a bayonet and fill it with non-metallic material.
Cladding with sheet materials
Technologies of wooden architecture include log houses made of logs, beams, cylinders, panel houses, panel houses, “framework” and half-timbered structures. Only log houses and half-timbers do not require façade cladding; external walls of all other types are decorated with siding, clapboard, block house, and panels.
For most of these options, a stone imitation of the basement level in the house is preferable.
The manufacturing technology is as follows:
- installation of the frame - two horizontal belts are attached to the pipes of the screw piles; the thickness of the timber is used to level the cladding plane, taking into account all layers;
- fastening the base – the best option is flat slate or DSP;
- waterproofing - produced by rolled material, which passes under the blind area slab, is folded onto a sheet of fiberboard to the very top;
- cladding - the resulting base is covered with rubble stone, clinker, porcelain stoneware;
- blind area - standard paving slabs, paving stones, rubber modules, concrete over cut-off waterproofing.

Scheme of picking up screw piles with sheet material.
The technology is cheaper than natural masonry, but more expensive than a frame system (analogous to a ventilated façade).
Brick, rubble masonry
The most expensive option for building a house on screw piles is traditional masonry. The technology is an imitation of a plinth, since the grillage of a wooden cottage in this case does not receive support from the masonry. To save materials, the tape is made in half a brick; it cannot be insulated. The first row is laid on a compacted sand cushion, which replaces the fertile layer. Waterproofing takes the form of a roofing felt tape laid both under the masonry and under the blind area.

Frame fence
When choosing a foundation on screw piles, they are usually guided by budgetary considerations. The most economical option for simulating a plinth is traditionally frame technology. This is an analogue of a ventilated facade, in which the lathing made of timber or galvanized profile is attached not to the walls, but to the body of the piles. The technology looks like:
- frame along pile pipes - two horizontal belts around the perimeter;
- waterproofing - roofing material vertically fixed to the sheathing, bent horizontally at the ground over the entire width of the blind area;
- basement siding - PVC sheets with imitation stone and brickwork are fixed with clamps, self-tapping screws to a metal profile or nails to a wooden beam;
- blind area - any material used to decorate sidewalks.

Trays and stormwater inlets can be immediately built into the blind area, draining the runoff into an underground reservoir.
The removal will allow you to reduce the thickness of the heat insulation in the floors and increase the operating comfort of the premises in the house. No insulation is used in the false base pie; communication pipes are wrapped with heat insulation in the underground, to the freezing depth in the ground underneath.
Thus, following the advice given by experts, you can insulate the floors along the joists, protect the underground from blowing, while maintaining the natural ventilation of the lower space.
Advice! If you need contractors, there are very convenient service by their selection. Just submit in the form below detailed description work that needs to be done and you will receive offers with prices from construction teams and companies by email. You can see reviews about each of them and photographs with examples of work. It's FREE and there's no obligation.
Made on screw piles, it consists of decorating the base load-bearing structure the buildings. Finishing is the final stage of building a house.
Facing a foundation on piles can be done in the following basic ways: creating a suspended plinth, creating strip foundation along the perimeter of screw piles, facing with basement siding, finishing with natural stone, facing the screw foundation with mosaic plaster.
Screw foundations are widely used in the construction of light structures. This type of foundation is universal due to the fact that it can be installed even on unstable soil, where the groundwater level is high, on slopes and near trees.
Facing the foundation on piles can be done in the following basic ways:
- Creating a suspended plinth.
- Creation of a strip foundation around the perimeter of screw piles.
- Cladding with basement siding.
- Finishing with natural stone.
- Cladding the screw foundation with mosaic plaster.
Each method has its own advantages, and differs in cost and amount of work.
Creating a suspended plinth

The essence of this method is cladding with sheet finishing materials that are attached to wooden or metal guides. This technology consists of the following stages:
- A sheathing is made, which is secured to screw piles using self-tapping screws. Metal profile pipes 40x20x2 mm or wooden boards 40x100 mm in size, pre-treated with an antiseptic, are used as guides.
- The corners of the guides are processed: the protruding parts are cut off and connected to the perpendicular ends of the counter boards using a profile angle.
- A small gap must be left between the sheathing and the ground to avoid damage during ground movements. This gap should be within 5-7 cm. The gap can be closed with a metal mesh so that pets cannot get under the house. Thermal facing panels are attached to the resulting sheathing: stone panels, slate sheets, facade slabs, asbestos-cement slabs.
- Finally, drips, ebbs, and metal corners are installed. For good ventilation of the subfloor, it is necessary to provide special vents.
The arrangement of a suspended plinth is justified by its following advantages:
- Economical. A suspended plinth will cost 3 times less than installing a strip foundation.
- Small amount of work and simplicity of the method.
- The hinged plinth provides good ventilation and protects the underground space from dampness, which prevents the formation of mold on the foundation.
- Aesthetics. Thanks to modern finishing materials, the foundation can be given an imitation of natural stone, marble, or wood.
Return to contents

The technology of this method consists in arranging a belt shallow foundation along the entire perimeter of the pile-screw foundation of the house. Brick or cinder block masonry is laid on this structure, so that it can then be lined with decorative materials. The sequence of operation of this technology is as follows:
- Dig a shallow trench around the perimeter of the base of the house and fill it with concrete mortar.
- Execute brickwork on a strip foundation.
- Create an outlet by placing masonry under the log.
- Finish the façade of the plinth. For this you can use thermal panels, plaster, “wet” facade, etc.
The advantages of a strip foundation are:
- An additional concrete foundation provides high strength to the structure.
- Insulation. Compared to a suspended plinth, a strip foundation creates an air gap that regulates temperature well.
- Aesthetics. Modern Decoration Materials create a unique imitation of natural stone or other premium materials.
- Cladding with a strip foundation makes it possible to build a basement.
In addition to the listed advantages, there are a number of restrictions on the use of this finish:
- Creating a brick plinth is dangerous on moving soils.
- A strip foundation cannot be erected on a site with a large difference in height.
- This method is quite expensive.
Return to contents
Natural stone finishing

Facing the foundation with natural stone is a reliable, expensive and elegant method. This method Suitable for both foundations on screw piles and other types of foundation.
The advantages of this finish are enormous:
- Durability and strength.
- Protective properties and resistance to mechanical damage.
- High resistance to moisture, ultraviolet radiation and dust.
- Environmental Safety.
- Color range for every taste.
- Classic decorativeness.
The disadvantages include:
- High cost.
- Difficult installation.
- Special care.
Only durable types of stone are suitable for finishing the foundation: granite, labradorite. It is better not to use marble and limestone, since these materials are quite soft and porous and their protective properties weaken over time.